Instructions for Removing and Replacing a Speedometer – Wolseley 1100/1300 Range
I recently had to remove and replace the speedo on a Wolseley 1300, which is not the first time I’ve done the job on one of these cars. Here’s some notes on how to best go about it – something you won’t find in the workshop manual.
Disconnect the battery (you will be fiddling around with live wiring).
Inside the glove box, (RHS) there is a plastic cap, rotate it counter-clockwise and it comes out/unclips.
Put a soft cloth over the steering column shroud so it doesn’t get scratched.
Take the ashtray out from the front, then reach behind it (through the hole in the glovebox) and you’ll find there is a bulb in the back of the ashtray which pulls straight out. It needs to be removed first, and then undo the wing-nut and clamp holding the ash-tray in place. This is also the retainer for the LHS of the dash panel.
Put some masking tape around the ignition/key barrel, and undo the round slotted nut. A pair of circlip or small-nosed pliers work in the slot, but it’s easy to slip and scratch the dash, hence the masking tape. This is also the retainer for the RHS of the dash panel.
Ease the dash panel out slightly, then reach behind it (again through the hole), find the speedo cable. Wrap a bit of masking or insulation tape around it about an inch below the cable ferrule nut (to stop it slipping right down the cable to the firewall), and undo it from the back of the speedo.
Mark and remove the wires from the fuel and temperature gauges (note there is one green wire connecting both the gauges which can be left in place), remove the warning lights from their sockets, and undo the earth wire on the back of the speedo.
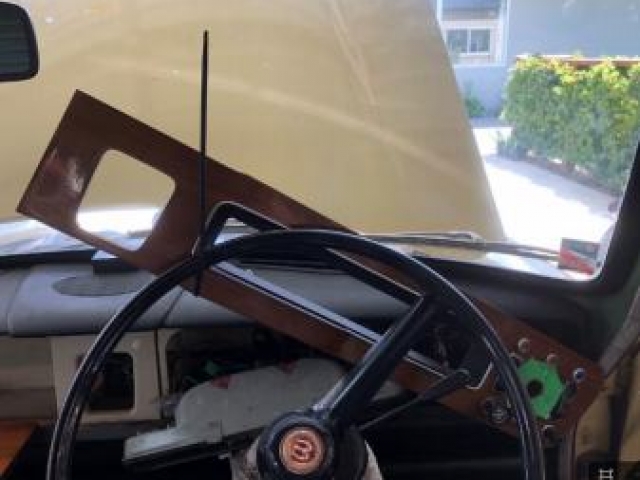
You can now ease the dash out further and cable-tie it to the steering wheel (see photo).
This means you don’t have to remove the wiring from the light and wiper switches, and speeds the job up considerably.
You will see two set screws on the top side, and 2 on the bottom side of the speedo, holding it onto the dash panel. Loosen (only) the bottom ones (use a small Phillips bit inside the jaws of a small adjustable spanner to do this, then remove the top ones altogether. The speedo unit will now come out by lifting it upwards out of the dash.
To remove the speedo head, you need to first remove the plastiglas front. Ease the crimped edge away from the surround very carefully with a screwdriver, and it will come out. Be really careful not to crack or damage the plastic face.
To get the speedo out of its housing, undo the 3 small screws around the speedo cable head, and carefully remove the speedo unit. Be careful, as it has a rotary ribbon which can be easily damaged.
Reassembly is the reverse of the above. When it comes to re-fitting the speedo head into its housing, make sure you don’t tighten the three screws until you have checked that the spools of the ribbon are not touching the housing. Also, don’t do the speedo cable ferrule nut up too tight – semi-loose is fine.
Finally, don’t forget to connect up the earth wire again or you will have no panel lights and don’t forget to reconnect the battery or you’ll have no lights at all! Just take your time, and you should have no problem.

