Derek Brehaut's Workshop
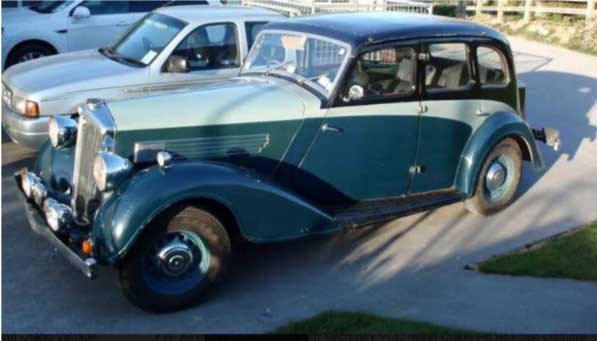
It’s been some time since I did an update on progress with the car and thought it was time. Back in 2015, I embarked on this restoration project with a self-imposed completion time frame of three years. That was up in August last year so it’s time to confess that I was extremely optimistic (some may say naive) as to how long things take to get done. As those that are familiar with the vehicle will be aware the 6/90 was in pretty good condition with some rust repairs already completed although the front guards and doors needed attention. Having decided to completely strip the body and remove it from the chassis the body was then mounted on a modified trailer frame. This was sent away to get the last of the rust removed from the front guards and doors, leaving the chassis free to be rebuilt.
The body returned from the panel shop within a month and it then took some months to get it into the selected paint shop. After several false starts the body finally went to the paint shop on the 1st of March 2018, in the meantime work had progressed well with the chassis completely stripped down and the suspension fully rebuilt as well as the motor and gearbox now installed as detailed in my earlier update of late 2016. In August 2018 I had clamped temporary brackets to the chassis to hold the radiator in place along with a make-shift consul holding an on/off switch, choke cable and starter button to allow me to run the motor. The official start-up was held on 25th August 2018 with a good gathering of Christchurch club members in attendance. After a false start,(timing was 180 degrees out) the timing was set correctly and the motor purred into life but true to its British heritage immediately began to leak oil. The culprit was found to be an incorrectly fitted front pulley, with the key pushing up and breaking the pulley and ripping the oil seal in the process. Another pulley was sourced from the club along with a new oil seal and timing cover. After stripping and painting the appropriate bits the timing cover, oil seal and pulley were installed with a new key fitted just in case. The motor was run up again to check for any problems but all appeared to be leak-free. Long may it last. The broken bits were then taken back to the workshop that had assembled the motor to ensure they were aware of the issue.
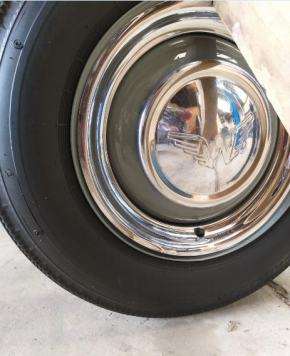
The radiator, temporary brackets, wiring etc. were removed from the chassis now awaiting the newly painted body. The paint shop had promised the body would be finished by Christmas 2018 and five rims painted in the body colour were ready in late September but a fire in their paint shop late in the year put paid to the body being completed. Luckily it was stored in a building next to the paint shop when the fire happened.
Just to make life a little more interesting, in March this year, we also sold up our smallholding outside Leeston, Canterbury and shifted to Oamaru North Otago where we intend to retire. Although we had disposed of most of the farm equipment, all those sheds of stuff do not fit that easily into my good sized workshop/garage. I have plenty of work to do here while we wait for the body to be completed.
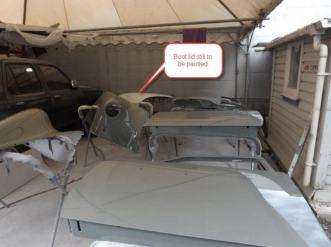
As of the end of May 2019, there has been some progress with the front guards, the doors and the firewall of the main body having received a top coat and the main body, bonnet and boot should be completed as I write. The vehicle body will then be assembled again and a full underseal coat applied to the underside and front guards. I am looking forward to the arrival of the body so I can fit out the doors, wiring etc. to allow the upholsterer to complete the headlining, door panels etc.
With everything falling into place another up-date should be possible later this year.
November 2019 – February 2020
Late July last year I purchased a very tidy 1936 25HP Wolseley Super Six from another club member in Ashburton. Having my workshop full with another Wolseley (6/90) I am restoring we agreed that I would complete the sale and pick the car up in September giving me some space to clear a spot for the 25hp. The car had just had the head overhauled with a complete set of new valves fitted along with new gaskets. By September the car had also had the radiator de-tanked, cleaned and repainted due to an overheating problem. Then it had all the brakes relined and slave cylinders honed or re-sleeved to pass a WOF. The Clutch and brake master cylinder still needed attention though I was looking forward to some good motoring, unfortunately, the head gasket failed the weekend I drove it home to Oamaru.

We were intending to use this car for the upcoming Wolseley Rally starting in Wellington in early March so I was keen to get on top of the issue.
Head gaskets for these cars are difficult to obtain so having had the good fortune to get a Payen gasket ( Thanks Nic) I was not going to install it until I was sure both the head and block were OK. Once removed I found the gasket had completely failed between three and four cylinders and was showing signs of leaking between one and two as well as five and six. The head itself looked alright but at some point, someone had done a large welding job up over the water jacket between three and four combustion chambers, presumably due to a crack in the casting through the water jacket. By this time I had also retrieved most of the spares that went with the car including three spare heads so I sent the original and one of the spares down to our local engine recon engineer for crack testing with the intention to use the spare good head if possible.
In the meantime, I stripped down the engine block as there was pitting where the head gasket seats between three and four cylinders and I was reluctant to take the chance so the block was going to the engineer to be milled. Having had to remove the complete engine I also decided to replace the clutch as, on inspection, the old clutch plate had worn so badly it was rubbing on the plate springs. These are wet clutches with cork buttons fitted through an aluminum plate. In the spares, there was a newly refurbished plate but the aluminum had two large cracks through it so was of use only as a pattern. A local VCC member here has experience in motorbike wet clutches and he was invaluable with advice as to how to refurbish the clutch plate. Cork tiles are better than modern bottle corks as the latter is too soft.
You have to have some wins to stay sane, we had put cork through the wet areas in our last house so I still had a few spare sheets in the shed and they were exactly the right size so have been cut and glued to the plate. Just need to put them in a lathe and run them down as they are too thick to install as is.
Murhpy arrived to tell me the plate is too large for my lathe so I am currently making an adaptor plate so I can mill the cork down to the correct thickness.
They say what you don't see you don't worry about. Perhaps I should have left well enough alone as when I removed the back main bearing cap the white metal was hammered and starting to break up as was number six big end bearing which is oiled from the back main. To add to the issues I found a small crack in the block running from the water jacket plate down behind where the starter motor would sit. The good news was the engine had been reconditioned at some point and the pistons and bore had very little wear as did the crankshaft. I think the issue with the bearing was due to the oil galleries being partly blocked with homemade gaskets and too much RTV gasket.
Having arranged to have the bearings re-metaled in Timaru we decided to repair the crack in the block before sending it away. The block was subsequently cleaned in an acid bath then crack tested only to find it was riddled with cracks and certainly not worth spending any more on it.
At this point, I still have a block of unknown condition in Ashburton and one from the spare car which is in the process of being stripped although I am not hopeful as it had been sitting for a long time with the head off and has rusted in the bores. On the bright side, it does appear to be about 20th over and my pistons are 40th over so there may be enough to clean it up by boring if everything else is ok.
If and that's a big one, we do find a block that can take the 40 over pistons there is still a chance we could have it ready in time but Wellington is looking decidedly shaky for the 25HP, Wilma (1500 Wolseley) is on standby.
You have to have some wins to stay sane, we had put cork through the wet areas in our last house so I still had a few spare sheets in the shed and they were exactly the right size so have been cut and glued to the plate. Just need to put them in a lathe and run them down as they are too thick to install as is.
Murhpy arrived to tell me the plate is too large for my lathe so I am currently making an adaptor plate so I can mill the cork down to the correct thickness.
They say what you don't see you don't worry about. Perhaps I should have left well enough alone as when I removed the back main bearing cap the white metal was hammered and starting to break up as was number six big end bearing which is oiled from the back main. To add to the issues I found a small crack in the block running from the water jacket plate down behind where the starter motor would sit. The good news was the engine had been reconditioned at some point and the pistons and bore had very little wear as did the crankshaft. I think the issue with the bearing was due to the oil galleries being partly blocked with homemade caskets and too much RTV gasket.
Having arranged to have the bearings re-metaled in Timaru we decided to repair the crack in the block before sending it away. The block was subsequently cleaned in an acid bath then crack tested only to find it was riddled with cracks and certainly not worth spending any more on it.
At this point, I still have a block of unknown condition in Ashburton and one from the spare car which is in the process of being stripped although I am not hopeful as it had been sitting for a long time with the head off and has rusted in the bores.
On the bright side, it does appear to be about 20th over and my pistons are 40th over so there may be enough to clean it up by boring if everything else is ok.
If and that's a big one, we do find a block that can take the 40 over pistons there is still a chance we could have it ready in time but Wellington is looking decidedly shaky for the 25HP, Wilma (1500 Wolseley) is on standby.


Derek
More Trials and Tribulations
We are now nearing the end of lockdown Level 4, for most of us Level Three will not be much different but there is light at the end of the tunnel. On the plus side, our section has received a lot of TLC and is showing the results, there are a few projects that cannot be completed until businesses get up and running again and materials sourced.
It is a similar sad state of affairs for both my Wolseley projects with the 6/90 still in Christchurch awaiting the completion of the upholstery and the 25hp Super Six still awaiting its reconditioned engine.
For those of you who read my last offering (The trials and tribulations of owning old cars), you would have spotted my typo, casket which should of course been gasket. In that article, I stated that getting the 25hp ready for the Wolseley Rally in Wellington-Wairarapa was looking decidedly shaky and so it proved with Lee’s faithful 1500 being used instead. To add insult to injury the 1500 not only carried Lee and I and our luggage but had a 25hp head on board as well. This had to go to Thomas Rowe Engineering just out of Palmerston North and at this point in time is still awaiting repair. This head was the best of four that I had available. The block out of the spares car was that badly pitted in the bores that at least two of the cylinders would need sleeving. I am keeping this one as a spare with another block retrieved from Ashburton selected as it was sound although someone had managed to drill a 40th indent in the block near number three-cylinder which has since been milled out. This block was taken to Timaru to have the main and big-end bearings white metaled then on to Christchurch for the Mains to be line bored. The block is now back at ‘Heads Off’ where it will be bored out to fit the old pistons and a new set of rings fitted.
So with two cars in bits, I am reluctant to start on the 8hp Wolseley sitting in the back of the garage and decided to use the lockdown to clean up the workshop and tidy up a few jobs on the 25hp. The car had the back seat modified with some extra timber being added to bring the back of the seat more upright. To access the boot you have to lift up the back seat and a rope was used to hold it up via a hook in the headlining. I started by removing all of the back seat and the extra timber, replacing this with a new top brace, new hinges and the boot strut from a 1500. The end result is working well with the strut holding the back of the rear seat up when access to the boot is required and the extra bracing lifting the seat into a more upright position. I then removed the blind from the rear window as it was just lying in a heap. This was dismantled and the material washed to remove as much staining as possible then the blind was reassembled and tested. (Works beautifully) The manual states it is an anti-glare blind to be activated by the driver by pushing a slide handle just above the driver’s door to raise the blind when a following car lights are too bright.
The next thing to be looked at was the fuel gauge which always read empty. A quick check of the sensor indicated the problem was here but to remove the sensor the fuel tank needed to be dropped. As it transpired the only issue with dropping the fuel tank is the exhaust pipe which runs directly under it. The exhaust needed to have the rear mount replaced anyway as it now consisted of a piece of number 8 wire twisted around the sub-frame and the exhaust as the original solid mount had broken. So two jobs at once although dropping the tank did mean it started to pour petrol out of the fuel line as this need to be disconnected. After emptying the tank the sensor was removed and tested. The rheostat was ok but the metal float had developed a leak and was full of fuel. This was emptied by drilling a small hole in it then the complete cylinder was disassembled, cleaned and soldered up again. At this point, it appears to be working OK but the gauge is not that accurate as with a little less than three-quarters of a tank it is reading close to full, but at least it is working.
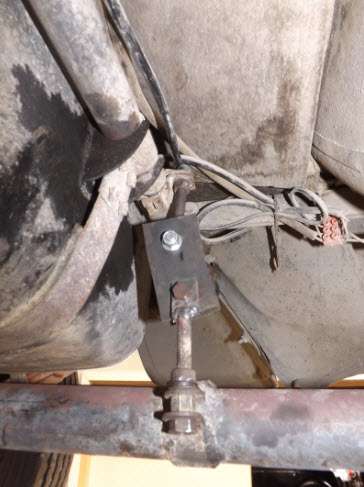
A new bracket was then made for the rear exhaust mount using the broken bracket and a piece of heavy rubber to make a flexible support.
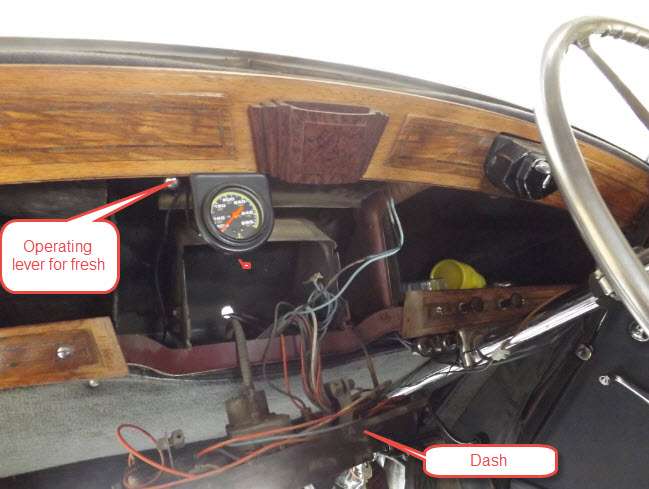
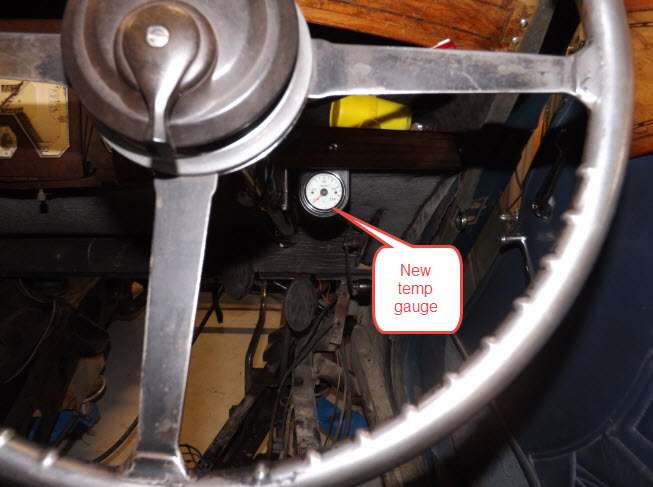
The other jobs so far include shifting the rearview mirror from the bottom of the front window screen to the top using a rearview bracket from the spares car. This gives a far superior view out the rearview mirror. At the same time, I installed the original finger bracket used to open and close the window screen. I had decided to shift the aftermarket temperature gauge as its mounting obscured parts of the dash and interfered with the operating handle for the fresh air vent. This job proved to be more beneficial than first thought as to relocate the gauge face I need to remove (Lift forward) the actual dash. This in turn, gave access to the fresh air vent cover and when this was removed, the drain points. Both hoses fitted to these points were badly perished and leaking so were removed. New ones will be installed when they can be sourced. In the meantime, the offending gauge had been completely removed and tested only to find it would not read above 60c when in boiling water. A new gauge has been sourced, tested and installed beside the steering column bracket with the gauge face being easily seen by the driver and out of the way of the art-deco dash. There is still work to do to install the probe into the engine as these engines never had a temperature gauge sensor fitted and the old system was not satisfactory.
The cleaning up of the workshop is continuing albeit with delays every time I pick up a piece to decide whether it should be kept, cleaned, labelled or scraped, inevitably resulting in other stored spares being removed for checking/sorting. I will get there one day.